Comparion® models exist within workgroups. Most users will be members of only one workgroup. If you are a member of more than one workgroup, then you will be able to select which workgroup you want to work with using the Select Workgroup drop-down menu.

By default, the active Comparion models are displayed. You can view Archives, Templates, and Deleted models by clicking on the respective tab names.

You can see several commands by clicking the arrow icon to the right of the model name, or by simply right-clicking a row:
 Learn more on Models Lists Commands.
The checkboxes to the left of the model names allow you to select one or more models and do specific actions such as Download, Delete, and Archive.

Deleted models go to the Deleted tab which can be restored or deleted permanently.
Archived models go to the Archives tab which can be activated or deleted.
The models list page shows the following columns by default:
- Online/Offline Online status toggle,
- Last access date and time, and
- the Status column which shows the project availability and additional details and actions, in addition to being Online or Offline:
Status | Description | Display (PM who triggered the status, if applicable) | Display (another PM or user) |
|---|---|---|---|
| Available | Available for evaluation The model is Online and not locked |  | (same) |
| Editing only (Project Manager) or Not Available (Evaluator) | Model is Offline Not available for participant's evaluation |  (PM) (PM) (Evaluator) (Evaluator) | (same) |
| Locked or Being edited | The model is Online but temporarily unavailable for evaluation |  |  |
| TeamTime Evaluation in Progress | TeamTime Evaluation meeting is in Progress |  |  (Stop is not available for Evaluator) |
| TeamTime Brainstorming in Progress | TeamTime Brainstorming meeting is in Progress | N/A (Brainstorming ends when PM leaves the brainstorming page) |  |
You can perform actions, if applicable, such as Join or Stop session (for TeamTime meeting).
The number of online users in the model is also displayed (not including the user currently logged in). Clicking the number link will open the online user's list.
You can select or deselect columns by clicking the column chooser icon 
DIDN'T SEE WHAT YOU ARE LOOKING FOR? Try enabling the Advanced Mode switch at the bottom of the page; this will show more columns as well as advanced options on this page.
HINT: For smaller screens, some of the buttons may be hidden. You may see the hidden buttons by clicking the ellipses  icon at the top right.
Create new models to begin new decisions.
Click the New Model button to create a new Comparion model using EC default option sets.


Depending on the model you will create, you can select from the Default Option Sets dropdown:

1) Choice project with few alternatives - pairwise being used for measuring alternatives as well as objectives.
2) Choice project with many alternatives - ratings being used to evaluate the alternatives.
3) Resource Allocation - same as (2) above, usually for the purpose of choosing a combination of alternatives for a portfolio or for allocating resources.
4) Risk Associate Model - for Resource Aligner's Risk Associated Model - with a Rating scale specific to evaluating alternatives' risks.
Additional options include:
- Use workgroup wording templates - use the "Workgroup Wording Templates" instead of the selected Option Sets wording. You can still change the wording after creating the model on the Model Details/Description page.
- Add objectives from predefined sets of objectives - redirect the user to the Objectives screen with the "Add predefined Objectives sets" dialog open, where the user can select from a predefined list of objectives.

Create new model from file if you had previously downloaded models that you want to use again, or if you want to utilize sample models and templates that come with Comparion.
Clicking the  button will open a window as shown below:

Click "Select File..." to browse for the file on your computer that you want to upload as a new Comparion model. The Model name is just the same as the file name, so you can change this as desired.
Note: When you upload templates, they are created as Comparion models and listed in the Models tab. To make them templates, you will need to create templates from these models.
You can create a new model from:
- a file previously downloaded from a Comparion model and stored on your computer (.ahps)
- an Expert Choice Desktop file (.ahpz)
- an archived file (.zip or .rar) containing one .ahps or .ahpz model
- a text file containing textual information about the model to be created (.txt)
You can create a Model from Templates if you have previously defined Templates.
Templates are models that have been cloned for quick model building. Templates may have predefined:
- objectives hierarchy,
- alternatives,
- information documents,
- contributions,
- groups and their evaluation roles,
- evaluation and measurement settings
Click 
Note: If the New from Template button is disabled, it means there are no templates defined yet. Check the Create Templates page for instructions on how to create templates.
Enter the model name and select from the available list of templates:

Click Create.
A new Comparion model is then created based on the selected template.
A Comparion model can be built by uploading a text file (.txt) with information that includes the objectives hierarchy, the alternatives and the participants of the model.
The text file can be created using a text editor such as "notepad". The text file, may have four(4) sections as shown below:
Each section is optional. You can upload a text file with only one or a combination of the sections. The header names are not case sensitive and can have a few variants (objectives, obj) -- make sure that there is "#" at the beginning of each header.
A node name (objective or alternative) and its description are separated with a "tab". A node description is optional. The level of the objectives is also specified using "tabs".
Below is a screenshot of a sample text file that can be uploaded to Comparion using the New From File option:

A specially formatted text file can be created for an existing project using the new "Export Model Structure to TXT file" found on the Edit menu on the Objectives page screen. This file can be edited to serve as a template for creating new projects from text files and can easily be populated from information that users might have in other files such as Excel, Google Docs, or Word.
When the information in the TXT file is populated from other files mentioned above (i.e copied from an Excel file), make sure that you save the TXT file in UTF encoding to ensure that the characters will be recognized when it is uploaded to Comparion:
Using notepad, save the TXT file by clicking File > Save as
Select UTF-8 for Encoding
Click Save
Creating a copy of your model (Save as) is helpful if you want to experiment with some changes but want to keep a copy of your model before making any changes. See also Snapshots
To make a copy of a Comparion model, simply go to the Models list, right-click the model or click  to the right of the model you want to copy, and then select "Save as..."

A dialog box prompt will be displayed as shown below: 
By default, the Model name is just the same as the original model name with the date and time stamp appended as shown above.
There are also options available:
- Copy Participants - copy the participants with their judgments (if any)
- Camouflage Participants Email - assign a random email name
- Camouflage Participants Name - assign a random participant name

- Camouflage Objectives Information - (Objective2, Objective3...)
- Camouflage Alternatives Information - (Alternative1, Alternaive2...)
- Copy Snapshot data - include snapshot data of the original model in the new copy.
- Save as Version - save the model into an earlier Comparion database version. This is helpful if you want to downgrade your model in case you want to use it on a site with an earlier database version.
When you right-click the model name or click to the right of the model name, a list of options will appear:

- Open model
- Save as - to save a copy of the model with a different name
- Archive - to archive a model
- Download
- Delete
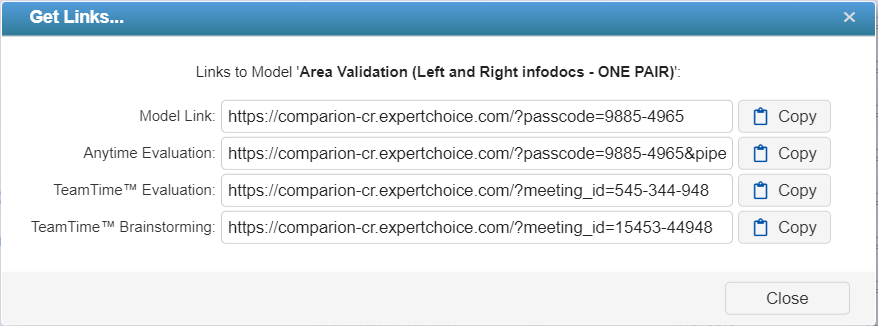
- Get Model link and copy to clipboard - model link with a passcode
- Get links... - shows a dialog box where you can copy the Model link, Anytime evaluation link, TeamTime Evaluation link, or TeamTime Brainstorming link.
- Create Template or Default Option Set
- Model Snapshots - open the model snapshots. This will work even when the model is closed
- Model Logs

You can also go to a specific page inside the model by clicking the corresponding option on the menu:
- Model Details
- Collect my input
- Evaluation Status
- Participants
- Allocate
- Results
- Invites
If you want to download, delete or archive several models at once, you can use the checkboxes at the left of the screen to select the models and then select the action you want to perform:
Models History lists the history of models opened by the currently logged-in user.
This can be found by clicking your Name > Manage Models > Models History:

Clicking the Models History will open a prompt as shown below:

You can search and click on the model name to open the model.
Some columns and features are hidden by default when Advanced Mode is on. Turn on advanced mode to see these hidden columns and features.
When the Advanced mode is ON, you will see the advanced options and additional columns on the Models list page (see highlighted):

Column Filtering
Use Column Filtering for the Model List to narrow down the visible rows (models) based on values in an column or columns.
 Add a row to the grid where you can search or specify the conditional statement(s) to filter the model list.

Click the magnifying glass icon to show the conditional expressions:

Auto-hide Columns
 Automatically hide columns to fit the page and show the hidden columns using the ellipses (...) displayed on the last column.

Auto-page Size
 Automatically assigns the pagination (number of models per page) based on screen size (to minimize scrolling).
Infinite Scrolling
 Displays all the models in the list (no pagination).
Model Statistics
 Opens the Model Statistics page.

Model Lookup allows you to list all the models your user is in (active, templates, archived, and deleted) across all the workgroups you have access to.
Model Lookup is executed by clicking your name > Manage Models > Model Lookup:

or by clicking the magnifying icon at the top of the models list:

The Model Lookup page is shown below:

Here you can search a model by name, description, or access code by typing in the text box provided.
Clicking the Model name will open the model.
You can sort by column by clicking the column heading.
Check the "Group by workgroup" checkbox to group the models by workgroup.
You can also show the models by pages by checking "Show by pages."
A model can be Online but temporarily unavailable for evaluation when it is locked or being edited by the Project Manager.
The model's lock status can be seen from the Model list status column or from the Lock toggle icon available at the top right of every page when the model is open.

A model can be locked in two ways:
- Manually by the Project Manager using the Lock toggle button
 . A manually locked model will remain locked until the Project Manager unlocks it using the Lock toggle button
  , or automatically after 20 minutes of inactivity in the model, see (2).
 - Automatically when the Project Manager is editing the model or simply on a page that can modify the evaluation (usually from the Define Model pages; e.g., Alternatives, Objectives, Contributions, etc.). The model will be automatically unlocked 1-3 seconds after the Project Manager leaves any of these pages.
 . A manually locked model will remain locked until the Project Manager unlocks it using the Lock toggle button
  , or automatically after 20 minutes of inactivity in the model, see (2).
 Evaluators who try to access the Evaluation while the model is locked will see this message:

If an Evaluator is already on the evaluation page and the model is suddenly locked, the Evaluator will see the same page above as soon as the evaluation page is refreshed.
Comparion checks the model's lock status from time to time and will automatically redirect the user to the evaluation page as soon it is detected to be unlocked. The Evaluators can also click the Reload button to manually check the lock status.
Locking a model is helpful to avoid losing any evaluation data and to make sure that the Evaluators will see the most updated version of the model's evaluation pages.
The Model Statistics page includes:
- Access Code
- Model size
- Snapshots size and count (Manual and Auto)
- Status
- Dates (Created, Last Visited, and Modified)

The Model Statistics page is shown below:

You can search a model by name, description, or access code by typing in the search text box.
Clicking the Model name will open the model.
You can sort by column by clicking the column heading.
You can also show the models by pages by checking "Show by pages."
Another way to filter the model rows you'll see on the Models List is to tag models as FAVORITES from the Models list.
Simply click the star icon to the left of the model name:

Yellow star indicates that a model is a "Favorite."
When a model is open, you can also access the same star icon to the right of the model name at the top:

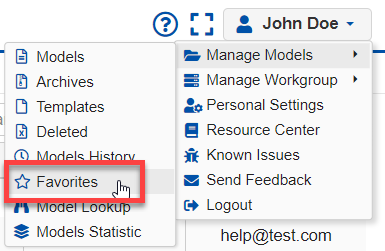
You can then list all your favorite models by clicking your User Name > Manage Models > Favorites as shown below:
The "Favorite" models dialog box looks like this:

Clicking the Model name will open the model.
Models with later database versions are not supported on sites with earlier database versions. Most people only work on one site, for example comparion.expertchoice.com. Downgrading is only relevant if you work on more than one site.
This scenario may occur when a model was created or opened on a Comparion site with a later database version, and you try to access the model on a site with an earlier database version -- either by:
- uploading the model, or
- opening the model when the sites are sharing the same database.
Uploading such a model will show an error:

In case unsupported models are already in the model list, they have a gray font color. You can hover on the model name to see details. 
In the examples above, the model version is 1.1.51; however, the site only supports version 1.1.46 (and lower), thus the model is unsupported.
To fix this, you need to create a copy of the model and save it to a lower version (in our example, to 1.1.46). Downgrading a model should be performed on the site that supports the current model version (1.1.51).
To downgrade a model:
1. Log in to the site where the current model version is supported (please contact us at support@experchoice.com if you need help).
2. In the Models list, right-click the model to downgrade or click the down arrow.
3. Click Save as... to open the save as options. Check "Save As Version" and then select the version you want to downgrade the model to, as in our example 1.1.46. You can also rename the model as desired. 
4. Click Save. The downgraded model will be at the top of the models list. 
You can hover over the model to see details; here the model is downgraded to 1.1.46 (which is now outdated for this site).
5. Select the downgraded model and download it as a .ahps file from the Download button at the top. Make sure you don't open the model as this will automatically upgrade the model back to the latest version (1.1.51). Instead, upload the downloaded downgraded model directly to a site that is running the earlier software version.

You can then upload the downloaded model to the site that only supports 1.1.46 and lower, or you can open it directly in case the database is being shared.
