Quick Help is custom help set up by the Project Manager to be shown during the evaluation process.
The Project Manager can view and set up Quick Help (QH) from the QH icons found at the top right of every evaluation step.

An empty Quick Help is indicated by ? with gray background as shown above; it will be orange  when there is content. Evaluators won't see the ? icon at all when it is empty.
To add or edit Quick Help, click the  icon beside ?. This will open the Rich Text Editor where the Project Manager can enter texts, tables, images, videos, etc.

The Project Manager can also use the quick help sample (if available) by clicking the "[Use quick help sample]" link:

The Project Manager can set the Quick Help to auto-display by checking the  check box.
This will automatically open the Quick Help dialog box when the Evaluator comes to the step where the QH was added. Evaluators can turn this off any time and just click the orange Quick Help button manually to open the QH dialog box.
Using the Rich Text Editor
Comparion includes a rich text editor for maintaining information documents. Information Documents can be useful to document the analysis in order to justify the decision (transparency). Information documents can also be used to inform evaluators and viewers of the decision model and subject matter. In addition to information documents, the rich text editor is used throughout Comparion wherever rich text is needed.
How to Use the Rich Text Editor
The Rich Text Editor can be opened from the following pages:
- Model Description

- Objectives or Alternatives pages (using the same Edit description button or
 icons)
 - Information Documents page
- Project Manager's evaluation (Information Documents and Quick Help)
- Welcome and Thank you pages

- Insight Survey questions

 icons)
A rich text editor is a pop-up window where the Project Manager can add text, rich text, hyperlinks, tables or grids, images, and videos. (Embedding a file is not supported by Information Documents, but you can add hyperlinks to files.)
A sample rich text editor, as displayed above, is comprised of:
- Heading - shows the name of the element the information document is associated with (Model name, Alternative/Objective Name, with respect to Insight Survey).
- Main Menu bar - contains all the options of the editor.
- Shortcut toolbar - below the main menu bar are the options that are commonly used for easy access. These options are also available from the main menu bar (except for Download and Upload).
- Rich text area - where the texts, links, images, etc. are entered or inserted.
- .OK, Apply and Cancel - are the actions to perform on the changes made:
- OK - to save and close the editor,
- Apply - to save changes and continue editing, and
- Cancel - to cancel or undo the changes that are not yet saved, and then close the editor (Note: When the PM already clicked Apply, or the Auto-save is already triggered, Cancel won't undo those changes).
How to Insert image
To insert an image on the text editor:
- Place the cursor in the position where you want to insert the image.
- Go to Insert > Image, or simply click the Insert image icon
 . The Insert/Edit Image pop-out will be displayed as shown:
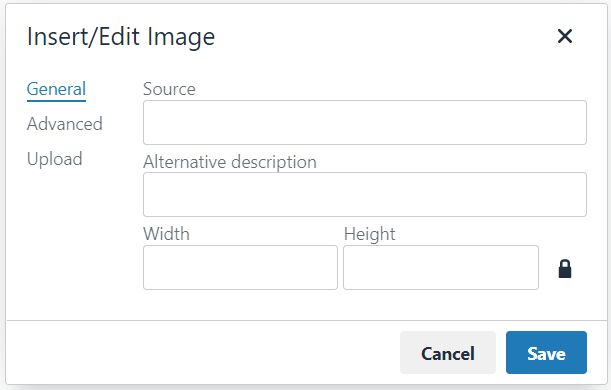
- Enter the public URL of the image on the Source field; or Upload the image from your machine by clicking the Upload option.
- Specify the optional image description, width, and height if desired.
- Click the Advanced menu to show more options to format the image.
- Click Save.
 . The Insert/Edit Image pop-out will be displayed as shown:
You can also insert an image by pasting it from the clipboard:
- Select the image you want to insert:
- Right-click and select Copy image, or
- Using shortcuts:
- PC: Control + V
- MAC: Command + V
- Place the cursor in the position where you want to insert the image.
- Paste the image to the rich text editor:
- PC: Ctrl+ V
- MAC: Command + V
You can also move the images inside the editor by the drag/drop or copy/paste function.
Image is broken? See How to fix broken images.
How to Edit or Format an image
You can also edit or format the uploaded images. Simply click/select the image from the editor area and you'll see tooltip options:
- Rotate counter-clockwise
 or clockwise
- Flip vertically
 or horizontally
- More Edit options
 will open a pop-out where you can:
 - Crop
- Resize
- Change Orientation (same as the rotate and flip options)
- Change Color options (brightness, sharpness, contrast, etc.)
- The
 (Insert/Edit Image) icon opens the same pop-out explained above where the Project Manager can:
- Specify the image description, height, and width
- Advanced options
 or clockwise
 or horizontally
 will open a pop-out where you can:
  (Insert/Edit Image) icon opens the same pop-out explained above where the Project Manager can:
How to Insert Video
Videos can't be uploaded to Comparion. Your videos should be uploaded to video hosting platforms such as YouTube, Screencast, Vimeo, etc., and then insert or embed them to the rich text editor.
For YouTube videos, you can simply enter or paste the video URL directly to the text area:

For videos from other sources such as Screencast, Vimeo, etc., you need to embed the video:
- Click Insert > Media, or simply click the Insert Media icon

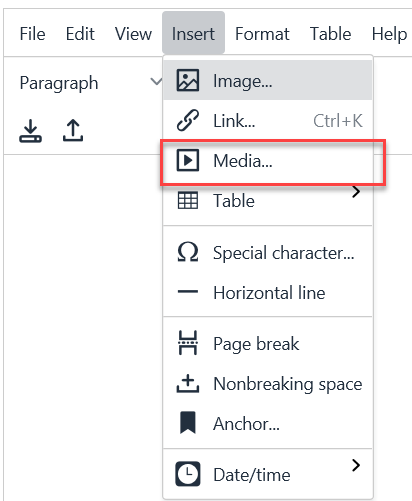


The insert/Edit Media dialog box will open as shown below:
2. Click the Embed tab and then enter the video embed code. 
See instructions below on how to get the embed code for some video hosting platforms:
- YouTube - https://support.google.com/youtube/answer/171780?hl=en
- Screencast - https://feedback.techsmith.com/techsmith/topics/absolute-url-link-to-screencast-com-videos
- Vimeo - https://vimeo.zendesk.com/hc/en-us/articles/224969968-Embedding-videos-overview


Download/Upload Info docs
You can download and/or upload the information documents using the download  and upload
  buttons.
The downloaded information document file is in .mht format.
Rich Text Editor Shortcuts
You can use the text editor shortcuts to easily perform certain actions within the editor. You can see the complete list by clicking the Help menu on the editor or Alt+0:

| Action | Shortcut |
|---|---|
| Bold | Ctrl + B |
| Italic | Ctrl + I |
| Underline | Ctrl + U |
| Select all | Ctrl + A |
| Redo | Ctrl + Y or Ctrl + Shift + Z |
| Undo | Ctrl + Z |
| Header 1 | Shift + Alt + 1 |
| Header 2 | Shift + Alt + 2 |
| Header 3 | Shift + Alt + 3 |
| Header 4 | Shift + Alt + 4 |
| Header 5 | Shift + Alt + 5 |
| Header 6 | Shift + Alt + 6 |
| Paragraph | Shift + Alt + 7 |
| Div | Shift + Alt + 8 |
| Address | Shift + Alt + 9 |
| Open help dialog | Alt + 0 |
| Focus to menubar | Alt + F9 |
| Focus to toolbar | Alt + F10 |
| Focus on the element path | Alt + F11 |
| Focus to contextual toolbar | Ctrl + F9 |
| Open popup menu for split buttons | Shift + Enter |
| Insert a link (if link plugin activated) | Ctrl + K |
| Save (if save plugin activated) | Ctrl + S |
| Find (if search-replace plugin activated) | Ctrl + F |
| Switch to or from fullscreen mode | Ctrl + Shift + F |
