What could go wrong?
Site at the FQDN specified in the setup.ini doesn't load or is not found
- You might not have access to the webserver. Try pinging it.
- IIS not installed or not configured properly. From the webserver with IIS on it, browse to http://localhost. If IIS is running, a "hello world" type page will load
- The SelfHostSetup.ps1 script fails to create the site. Run IIS manager and attempt to verify the existence of the site. If the site does not exist, new sites can be added through the IIS GUI. Click on "Add Website" and fill in the form.
- After changing some configuration values the website needs to be restarted from IIS Manager.
Webserver cannot access database
- If the website does load, you may see a error message near the bottom of the page in the middle. Hover your mouse over the error message to see a more detailed explanation of the error.
- Database address or credentials are incorrect.
- Database is not yet created. Go to this step for instructions on how to create it.
Resources not loaded
- Make sure IUSR_* permissions include the /DocMedia folder
- Make sure the DocMedia folder is not empty
About Setup and Config Files
- setup.ini - contains configuration items, and is used by SelfHostSetup.ps1 to update the configuration files located in the Application folder.
- appSettings.config - Check this file when troubleshooting to make sure the values are correct.
- connections.config - Check this file when troubleshooting to make sure the values are correct.
Authorization Error on the Build Repository
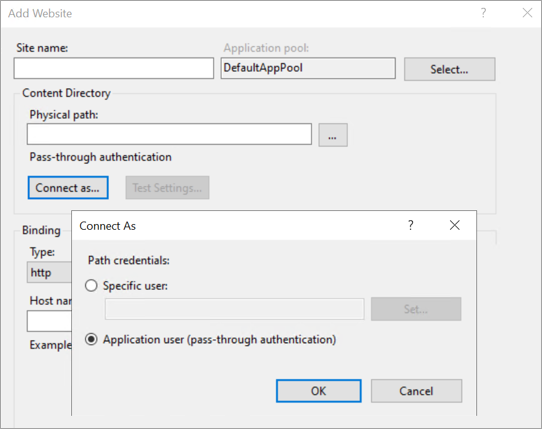
- From IIS, add a Website by right-clicking on Sites

- Provide the site name and the physical path.

- Click Connect as...
- If you want to connect with a specific user, click Set and then add the user of the targeted machine, e.g. Administrator or any, Please provide the username and password, and click OK.

- If you don’t want to connect to a specific user, select Application user (pass-through authentication).
- If you want to connect with a specific user, click Set and then add the user of the targeted machine, e.g. Administrator or any, Please provide the username and password, and click OK.
Can't create a database (Self-hosting using Windows Authentication with a database not connected to the IIS server or insufficient permission)
- Open the IIS Manager.
- Locate the application pool used by your website or web application.
- Right-click on the application pool and select "Advanced Settings."
- In the "Advanced Settings" dialog, under the "Process Model" section, change the "Identity" to a "Custom account" and enter the details of your service account.
By changing the application pool identity to a service account, the permissions needed to create the database will be successfully granted. Please refer to the images below for a visual guide on how to make these changes.

Home page with message "This configuration is not compatible with Windows Platform FIPS-validated cryptographic algorithms"
- Login in as System Admin
- Go to System Settings
- Enable FIPS mode configuration

Previous: Install Expert Choice Self-host instance


